In a previous post we saw what a backup is and why it is essential to perform it regularly. We also mentioned the existence of some software that allows you to facilitate and automate backup operations. So now it’s time to discover one of these software and understand how it works and how to make the most of it.
Borg
Borg is a free and open-source command-line tool that allows you to create de-duplicated backups and makes use of compression and encryption. There are a lot of big words, so it’s best to analyze one point at a time calmly.
free and open-source
It means that to use the software you won’t be required to pay for it, or accept a commercial license. To be precise, open-source means that the software belongs to everyone, a little bit also to you and that if you want you can modify and change it as you like.
command line
It means that Borg has no graphical interface. So no pointer, no icons and no menus, just characters in a terminal. Probably you’re already thinking of closing the page, “I’m not a hacker”, but don’t worry, since Borg belongs to everyone, someone has decided to modify it and give it a graphical interface. So don’t worry, you don’t need a degree in computer science to make backups.
de-duplicated backups
It means that there is no duplication, so each file is saved only once even if it is present several times. This is very important because if you don’t change a file between backups Borg understands that you don’t need to make a new backup. This is why creating a backup using Borg is faster and takes up less space than other software that does not use de-duplication.
makes use of compression
I think this is the simplest point. Compressing the data means that it will weigh less, which gives us a double advantage; less disk space and faster transfer speeds.
Use encryption
Using encryption means that the data is encrypted before being backed up. Encrypting information means making it unreadable for all other people. This way, even if someone manages to access your backup, they will not be able to see the data contained in it.
Now that you understand what Borg is, it’s time to figure out how to use it.
Borgbase
The backups made by Borg are saved inside a repository. You can imagine this repository as a folder that contains all your backups. A repository can be either local or remote; in the first case the backups are saved on the same machine where the data to be backed up is located, while in the other case on a different machine.
In this guide we’ll use a remote repository in order to have an off-site backup. In particular we will host our repository on BorgBase a storage service designed specifically to work with Borg.
The main advantage of this service is that it has already integrated alert messages in case of missing backups. This means that if for any reason Borg stops working we will receive an email alert so that we can remedy the problem as soon as possible. Another advantage of BorgBase is that it provides all users with 10GB of storage for free. However feel free to use the service you like best.
Vorta
Vorta is a client for Linux and macOS1 that allows you to use Borg through a graphical interface. The procedure to configure everything is not complicated, but requires several steps and to synchronize certain configurations between Vorta and BorgBase, for this reason I recommend you to pay attention to the following steps.
Step 1: SSH Key Generation
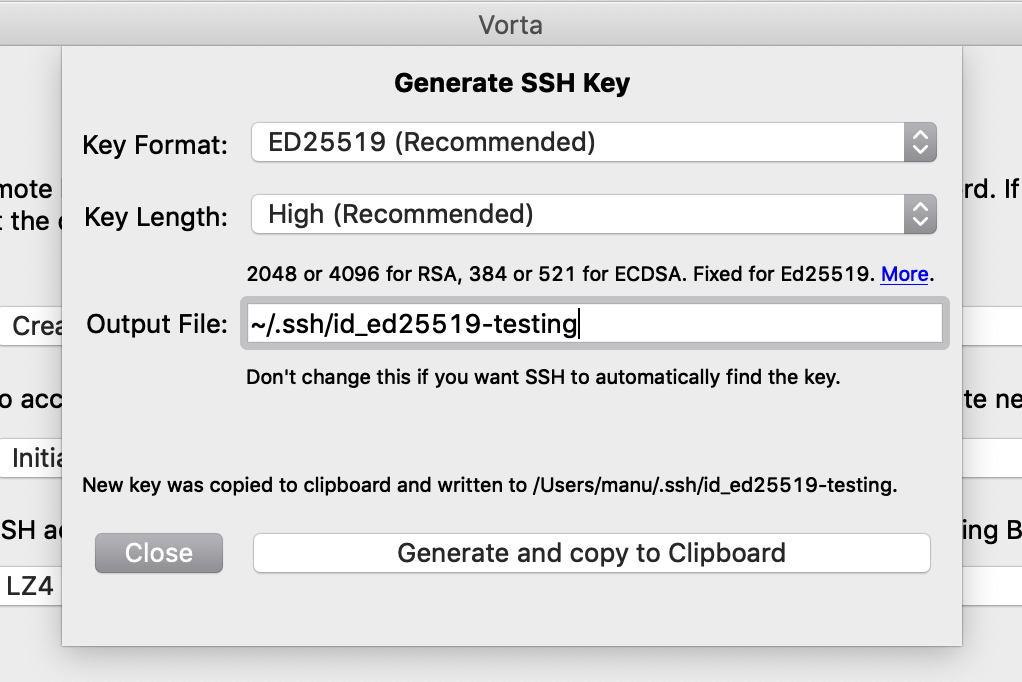
SSH keys are asymmetric encryption keys; understanding how they work would be nice, but it’s way beyond the scope of this post, so for now it’s enough for you to know that they’re necessary for your PC to communicate securely with BorgBase. To generate SSH keys we use the Vorta interface. From the “SSH Key” drop-down menu you have to choose “Create a new key”. At this point a pop-up will open in which we can configure the characteristics of the key. Unless you have special needs, it is preferable to accept the default configurations, changing only the name of the key (“Output file” field). The key generation is done by pressing the “Generate and copy to clipboard” button).

Step 2: Add SSH key to BorgBase
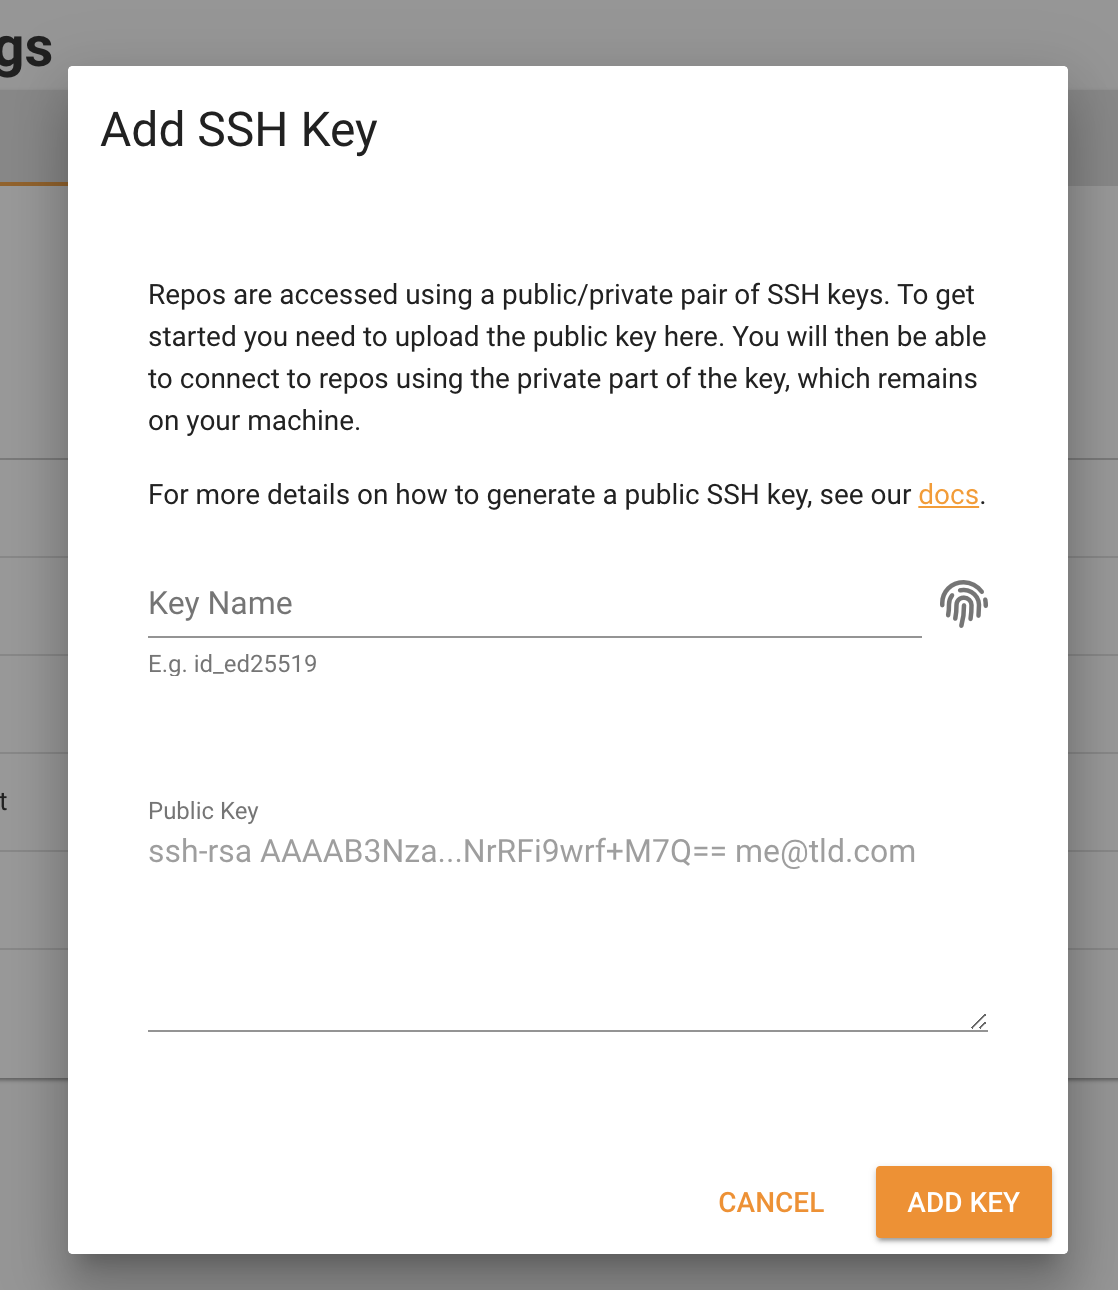
Once you have generated the key you need to add it to your account on BorgBase. After logging in you need to go to “Account”, then to the “SSH Keys” tab and finally press the “ADD KEY” button. A pop-up will ask you to enter the “Public Key” previously generated and already saved in your clipboard, and to choose a name for the key. When you’ve completed these steps just press the “ADD KEY” button to finish the adding operation.

Step 3: Creating the repository
Before you can leave BorgBase you need to take one last step; the creation of the repository where you will save your backups. To create the repository you have to click on “Repositories” and then on the “NEW REPO”2 button. You’ll be asked to give a name to the repository and you can configure other parameters, such as setting a storage limit or configuring when to send an email alert. Configure these parameters as you like, the important thing is that you add the key you added to the list of keys with full access.
Once you have created the repository you should see it in the list of repositories. To the left of the name is the icon for copying. Pressing this button will copy the address of the repository you just created to your clipboard.
Step 4: Adding the repository to Vorta
At this point you can return to Vorta and in the dropdown menu associated with the “Repository” item you can select “Initialize new repository”. As value of the field “Repository URL” you must paste the address of the repository copied at the end of step 3 and as password choose the one you prefer, as long as it is effective. For other configurations you can use the default ones. When you have completed all the steps click on the “Add” button.
Step 5: Selecting the folders to back up
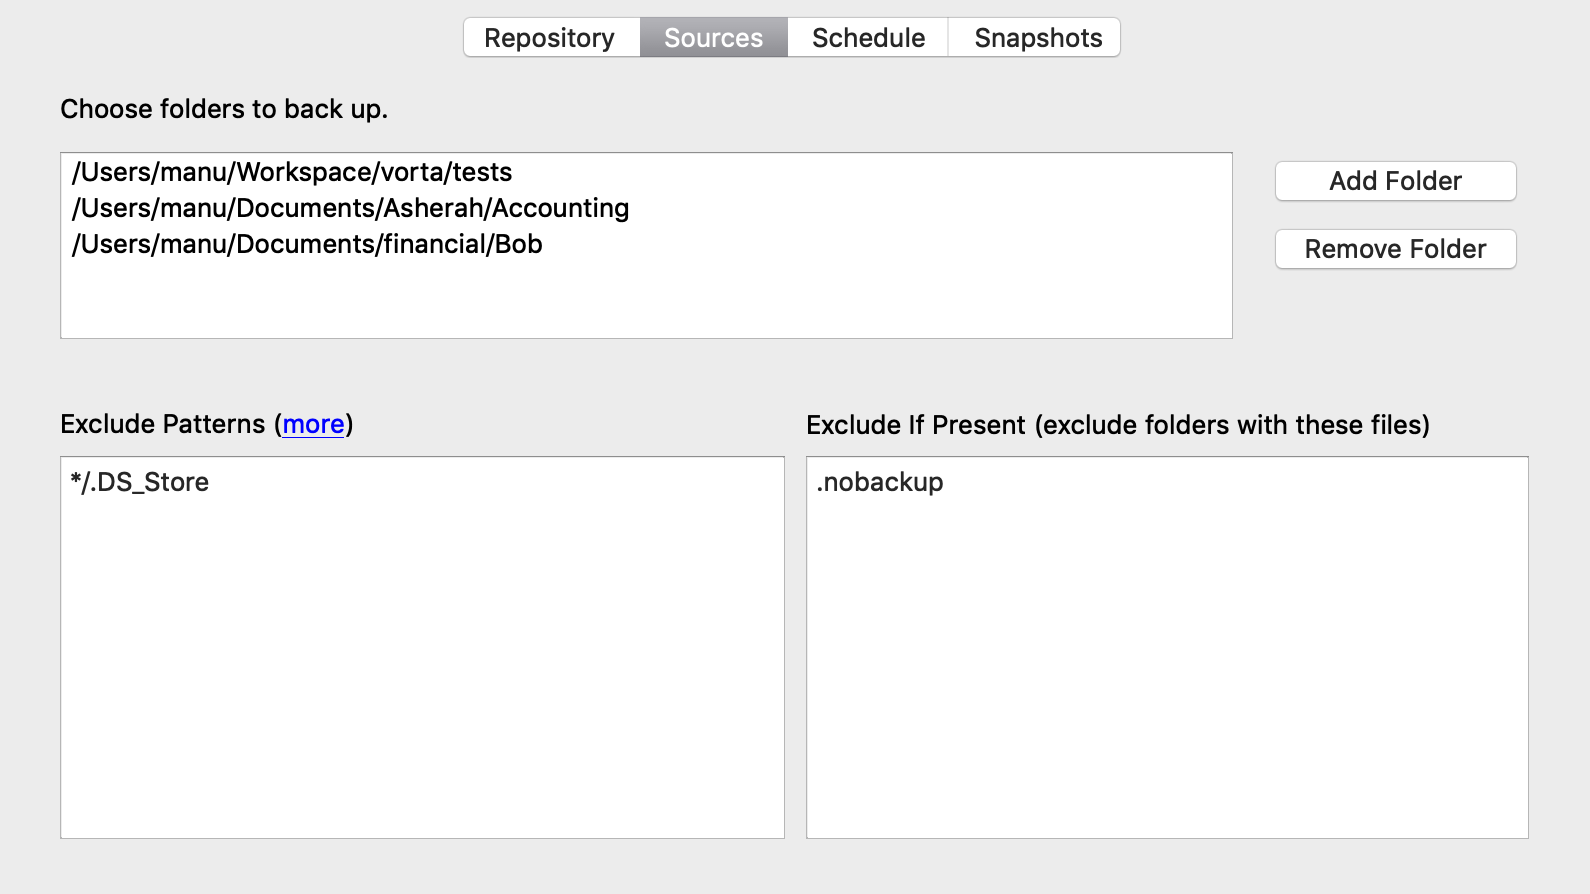
I assure you that we are almost at the end of this guide, just a few more steps and you will have your automatic backup process. You just have to decide which folders you think should be backed up and which should not. To do this, just go to the “Sources” tab, press the “Add Directory” button and select the folders you are interested in.

Now, to start the backup, just press the “Start Backup” button.
Step 6: Automation
As a reader of mine, you know that for a backup to be effective it must be done regularly and to do something regularly the best thing is to automate it. Fortunately, Vorta allows you to schedule backups to run automatically. To activate it go to the “Schedule” tab and select the backup frequency that best suits your data. In addition, for everything to work properly you must allow Vorta to run automatically when you start your PC. To do this, go to the “Miscellaneous” tab and check the “Start Vorta automatically at startup” option.
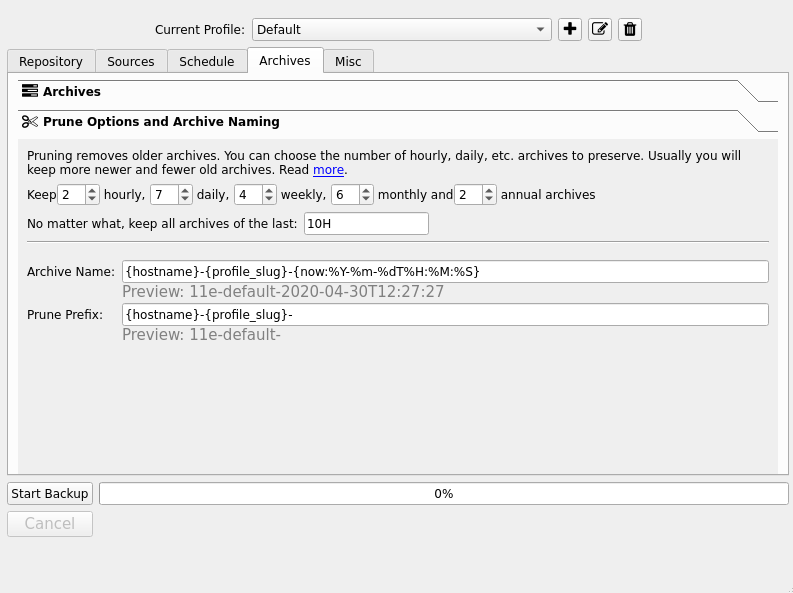
In addition to automating the execution of backups it might be useful to automate their deletion as well since we are not interested in keeping all backups forever. Vorta allows us to define an expiration date for each backup so that we can automatically delete them once this deadline has passed. To do this you have to go to the “Archives” tab and select the “Cleanup and archive name option”. Through a series of fields you can define how many archives to keep on an hourly, daily, weekly, monthly and yearly basis. Select the values that best suit your needs, keeping in mind that generally it is preferable to have a greater number of backups for the closest intervals and then fewer and fewer as the interval expands. Finally go back to the “Scheduling” tab and select the “Thin out old archives after every backup” item.

OK, we’re done, now you have your automated backup system.
Currently it isn’t possible to use Borg and Vorta on Windows natively, but it is possible through the Windows Linux Subsystem (WSL). For more information see the official Vorta documentation here. ↩︎
The free BorgBase account in addition to defining the limit of 10 GB of data also imposes a limit on the number of usable repositories that can not be more than two. ↩︎